Showing posts with label Roast control. Show all posts

Thursday, June 12, 2014

Bean Probes- Types and Placement


Q:
I am intending to add a bean probe to my roaster and I am confused by the different probes, and where to place the probe to most accurately read bean temperature: can you help?

A:
The widespread use of temperature probes in coffee roasters over the last decade or so, even by “old school” or “artisan” roasters has helped make our industry more professional and safer.  Additionally, it has helped spark the movement toward the profiling of coffee by more accurately, and more quickly, measuring changes along the roast time and temperature curve.  In coffee roasting we are generally discussing 3 types of probes: J type thermocouples, K type thermocouples, and RTDs.  Let’s start with the thermocouples.

Thermocouples (Type Js and Ks)

All thermocouples measure temperature in the same way: by utilizing the known temperature gradient of dissimilar metals.  These dissimilar metal wires are housed within the outer sheath of the probe, most often made of stainless steel.  The heating and cooling of these metals create EMF (electromotive force) that is read as voltage this is then translated into a temperature and read by a repeater, controller or computer.  Both J and K thermocouples work in this manner. The practical difference between a J and a K is the range and therefore the accuracy of each type.  A J type thermocouple can measure up to 1380 F, while a K can measure up to 2300 F.  This means that Js are more temperature sensitive than Ks.  Because coffee seldom sees temperatures much above 470F the more discreet readings of the J are a better fit for use as a bean probe.

So, why use type K thermocouples at all.  Type K thermocouples have their use in coffee roasting operations for the reading of temperatures in afterburners.  The higher temperatures required when operating afterburners are at the very limit of what a J can read and continued operation at this level will eventually cause a J probe failure, making Ks much more practical for this operation.  Also, the more discreet readings required in the coffee roasting process are not needed in the operation of pollution control devices.

RTDs (Resistive Temperature Device)

Resistive temperature devices (RTDs) measure temperature differently from thermocouples: RTDs work by measuring temperature induced electrical resistance across the elements.  Once again the elements are housed in a stainless sheath similar to the thermocouples. 

Type J versus RTD

While either a J type thermocouple or an RTD are well suited for use as a bean probe there are definite and distinct differences between the two.  Below is a quick reference list of differences:

RTD

  • Able to accurately and easily calibrate
  • Easier to bend without damaging
  • More accurate
  • More stable throughout the profile

J Type Thermocouples

  • 2-3 times cheaper than RTDs
  • More durable
  • Responds faster

The increased accuracy of the RTD comes from the linear nature of the temperature vs. resistance plot, as well as their better stability.  Thermocouples on the other hand are decidedly non-linear leading to more drift from profile to profile, this temperature drift decreases stability.  Generally speaking, most roasters using either a basic set point controller (or using a PID controller in this manner), or a repeater are fine with a J type thermocouple.  While many, if not most profile control systems (and better profiling data-loggers) are using RTDs as these systems are more able to capitalize on the increases in accuracy and stability, thereby justifying the increased cost.

At the end of the day, the decision ultimately lies with the owner/operator, as both of these probe types will work well- so long as whatever is being used to read the temperature can accept the signal from the chosen probe type. And, they are placed so that they can measure the surface temperature of the coffee.


Placement for accuracy

At the risk of sounding too obvious, if you want a probe to read bean temperature, then you need to place it where it is in contact with the beans.  In fact, the probe needs to be immersed in the coffee.  For front opening drum roasters this can be a pretty simple part of the process (see drawings).  For certain types of drum roasters, those where the coffee does not ride up against the faceplate; side openers, bottom openers, etc… then some modification maybe needed in order to accurately measure bean temperature, this modification is often accomplished with a funnel shaped catch that allows a mass of beans to surround the probe.   Fluid bed roasters present a special challenge to the measurement of bean temperature as well.  The larger volume of air, and the movement of the coffee within the chamber, while consistent, will read higher temps than drum roasters; making it difficult for fluid bed and drum roaster operators to exchange accurate roasting information.

For front opening drum roasters the probe should be placed somewhere in the lower quadrant of the uptake side of the drum.  For clockwise rotating drums this would be the lower left, for counterclockwise rotating drums the lower right.  If you need to roast smaller batches then the lower you should place the probe in the relevant quadrant.  The most important thing to understand about positioning a probe for accuracy is immersion, and immersion depth.

Immersion Depth

When attempting to place a probe for reading bean temperature it is important to understand where on the probe (or more accurately how much of the probe) the temperature measurement is actually occurring.  Temperature measuring occurs at the end of the probe back and how much of the end of the probe is determined by the diameter of the probe. You want the probe to be immersed in the coffee to a length of 10 times the diameter of the probe.  So, if you have a probe that is ¼” in diameter it should be surrounded by coffee for the last 2 ½” from the tip back.  Likewise, a 1/8” diameter probe needs a 1 ¼” immersion depth.  These depths can be accomplished bending the probe if there is not enough bean mass depth horizontally (see drawing).

Mounting the probe

The mistake most often made when mounting a probe through the faceplate is not using the correct mounting hardware, or not using any hardware at all.  In picture 3 there are 2 Type J thermocouples both with the correct mounting hardware.  This is a threaded compression fitting, one end is threaded into the faceplate and the nut, with the compression barrel is screwed into the fitting.  The barrel tightens against the probe, holding the probe in position.  If a compression fitting is not used, then the force of the coffee pushing against the probe can spin the probe out of position, possibly damaging the probe.  Roasters often will use tape or some type of adhesive to hold a probe in place, this is not recommended as it will loosen and can damage or even destroy the probe.

When positioning the probe, before bending, and or tightening it is important to ensure that you are not contacting either the faceplate, the drum wall (this will throw off your measurements) or the fins and supports for the drum wall (this can destroy the probe).

Bending the probe

It is often the case, as in picture 2 that a bean probe will need to be bent in order to get an accurate and consistent bean temperature reading.  The probe in picture 2 is an RTD, RTDs are easier to bend and can be bent using the thumb as a rest, and bending over the pad of the thumb.  It is more difficult however to bend a Type J thermocouple and care must be taken not to crimp or damage the interior of the probe.  It is best when bending a J thermocouple to use a mandrel (a pulley or rod will suffice) that is at least 21/2 times the diameter of the probe.  Do not attempt to bend a thermocouple without using something to bend around.  With both probes you need to take care not to crimp the probe when bending for a 90 degree angle.

More Accurate Tools, Safer Operation and Better Coffee

Regardless of which type probe you chose, or your reason for choosing it, using a bean probe to help you monitor your coffee during roasting will be one of the best business decisions you will ever make.

Saturday, May 17, 2014

THE HEAT IS ON

THE HEAT IS ON

God grant me the serenity
to accept the things I cannot change;
the courage to change the things I can;
and the wisdom to know the difference

THE SERENITY PRAYER seems tailor-made for the task of controlling and understanding the process of roasting coffee, especially when the discussion turns to heat and heat transfer. Conduction, convection and radiation--the three forms of heat transfer - are deceptively simple scientific concepts that underscore some of the more fractious debates within the coffee roasting industry. In our current age, when scientific terms are often used and misused, to prove or disprove often diametrically opposed points of view, these three terms are at the heart of two of modern roasting's most fundamental debates, one practical and the other very much philosophical.

The practical debate centers on how to control the rate of heat transfer in the roasting process or, more simply, how to control the roast itself. This debate is at the base of the more specific drum vs. air question, as well as any number of smaller arguments about what tools are the most necessary and return the best value for the investment, which manufacturer's equipment has the perfect balance between differing types of heat, and other niggling controversies. Many of these debates do nothing more than serve to distract us from the practical task at hand--controlling the roast.

The philosophical debate is simply whether the act of coffee roasting is an art or a science. And like many modern philosophical debates, both sides tend to use science, specifically the science of heat transfer, when making their case. Not unlike the debate over evolution and creation science, this dispute often reflects more about the user than the principles used to bolster either argument. And like the seemingly never-ending discussion about evolution, the absolutists on both sides seem to be the only ones with an opinion. The fallacy that is the art vs. science debate, and the absolutists on both sides, make it difficult for the rest of us to find common ground, to gain a better understanding of what we need to know and, more importantly, how that knowledge pertains to our own distinctive roasting operations.

Since most of us already have our roasting equipment, let's set both debates aside and assume that what we're really attempting to do is to gain better control of the roasting process within our own operations. Better control will help us create a better and more consistent product in a much more repeatable, and hopefully in a more efficient, manner. Better control requires a basic working understanding of the three types of heat transfer--conduction, convection and radiation--and how they work within a drum roaster. In short, as roasters we are interested in the application of science, not necessarily in the science itself.

Conduction

Conduction is the transfer of heat from direct contact between the molecules of a hotter substance to a cooler one. If you were to accidently touch the end of the trier to your nose while attempting to smell your coffee, and burn your nose, this would be the result of conducted heat: the hotter molecules of your trier directly transferring heat to the cooler molecules of your skin. In drum roasters, we have three potential sources of conducted heat: the drum, the faceplate and the beans. There are those who would argue that the metal of a hot cooling tray is also a potential conductor, but for this to occur the sides and/or bottom of the tray would need to be hotter than the coffee itself. And while warm cooling trays can lengthen cooling times, they should never be hot enough to conduct heat directly to the coffee.

The rate and ratio of conduction in a drum roaster is initially affected by drum preheat temperature and load mass. In most modern drum roasters, approximately 80 percent of the heat transference is via forced convection. In air roasters, the percentage is significantly higher.

Convection

Convection is the transfer of heat through currents in a liquid or gas. In the case of coffee roasting, the transferring substance is air and the receiving substance is coffee. There are two major types of convection: natural convection and forced convection. Natural convection occurs as our air heats up, causing density changes; as air grows hotter, it gets lighter and rises, while the denser, cooler air falls. This flow then allows heat to transfer through the natural movement of buoyancy. Forced convection is heat transferred through currents that are moved by an outside force, such as a pump or fan. Forced convection is a quicker, more efficient method of heat transfer than natural convection.

In both drum and air roasters, forced convection is the major mode of heat transfer in the roasting process. Air roasters force air through the roasting chamber via positive pressure (blow), and drum roasters use negative pressure (suck). Either way, when roasting personnel discuss convection in the roasting process, it is forced convection to which they are referring.

The rate and ratio of convection in a drum roaster is directly affected by airflow and energy supplied by the burner. The higher the airflow and the higher the energy input from the burner, the faster the roast.

Radiation

 roaster

As the roaster, it is your job to begin to gain a better understanding of each source of heat.

Radiated heat is thermal radiation that is defined as electromagnetic waves, and it occurs naturally between two bodies of differing temperatures. It needs no carrying medium, unlike conduction and convection, and travels at the speed of light. A substance's ability to accept and/or throw off radiated heat is affected by its color, temperature, density, surface area, finish and geographical orientation to other thermal-producing bodies. In short, radiated heat is the most complex type of heat transfer for laymen to understand, and in the case of coffee roasting, very difficult to measure or to control. For roaster operators, the important thing to remember about radiated heat is that it exists, period. You can neither measure it nor control it, so realize it's there and then focus on the types of heat you can both measure and control.

There is, however, some confusion over radiant heat or infrared burners in drum roaster applications. Even using infra-red burners, it is still the conduction of the drum and the beans, plus the forced convection of the air, that is of primary concern to the operator.

The rate and ratio of radiation in a roaster is an unknown.

It Is About Total Energy

Drum, Air, Bean
Air, Drum, Bean
Bean, Drum, Air

These are the three sources of heat over which you, as a roaster, have some level of control. The little mantra above represents the periods of the roast at which each type of heat is at its most influential. At the beginning of the roast, the amount of stored energy in the drum--represented by drum or preheat temperature--is at its most important and potentially most damaging to the bean. Air or convection is the dominant form of heat transfer throughout the roast, but air is also the allimportant driver for the body and flavor formation portion of the roast. Toward the end of the roast, the coffee beans themselves become an important source of energy and can actually become the dominant way that heat is transferred in some roasts and/or roasters. At the end of the day, however, all of the above forms of energy play their part in the process. As the roaster, it is your job to begin to gain a better understanding of each source of heat, and then exercise that knowledge of each within your own equipment, to better control your roasting. This is what the concept of total energy is about.

Three important things to remember regarding total energy
  1. Coffee roasting is a dynamic process that changes throughout the course of the roast.
  2. There is infinitely more energy later in the process than earlier.
  3. None of the forms of heat transfer are independent of one another.

Strategies For Gaining Control of the Roast

Conduction (Drum/Faceplate to Bean)

Many roasters believe that they have little or no control over drumto - bean conduction. This simply is not true. What is true is that you only truly have control over this type of heat transfer at the beginning of the roast. Once a roast has begun, there is little you can do to affect this type of heat transfer. But, at the beginning of the roast, there is plenty that you can do. Controlling drum-tobean conduction is all about preheat temperatures.

Roasters should set and follow preheat temperatures. Preheat temperatures represent stored energy. The higher the preheat temperature, the hotter the roaster, the more energy is stored in the drum and the faceplate, and the more energy can be transferred via conduction. By being consistent in your preheating, you will be starting every roast with approximately the same amount of stored energy, allowing you to roast in a more consistent manner.

For partial batches, it is absolutely imperative that you lower your preheat temperatures if you wish to follow a similar profile as when you are roasting a full batch. Less coffee (mass) requires less preheat energy--pretty simple. Partial-batch preheat temperatures can easily be determined with a little experimentation; just take note of the lowest reading via your bean probe after the coffee continued on page 70 The HEAT IS ON: A Roaster's Guide to Heat Transfer (continued) is dropped in the drum. You want this point of equilibrium (sometimes called "turning point") to be the same, or nearly the same, regardless of batch size. If, when roasting partial batches, you see that the point of equilibrium is above that of a full batch, then lower your preheat temperature the next time you roast this size of batch. Eventually, you will be able to determine the correct preheat temperatures for the varying load size of your roaster. Remember this when roasting partial batches in drum roasters: It is always easier to add energy than to take it away once your roast has begun.

Symptoms of too much conductive heat (drum to bean)
  • Tipping
  • Uneven roasting/too fast
  • Mottled/scorched beans
Conduction (Bean to Bean)

Through the majority of the roast cycle, you have two sources of heat energy--the drum and the air. Just before you hear first crack, you have a third source of energy--the coffee beans themselves.


A well-functioning cooling system is critical for gaining control of roast profiles.

As the coffee approaches first crack, it begins to go exothermic and throws off heat, hence the sound associated with the cracking of the bean. Sound is a form of energy, and the cracking of the bean signifies that energy is being released. If this energy is not accounted for in the overall energy equation, then the roaster risks losing control of the profile, or the roast. There are three strategies for taking control of the roast at this point: adjust the burner down or off, increase airflow, or both. In essence, you are manipulating the rate of convection in order to control the total energy and hence the profile of the roast.

Symptoms of too much heat at first crack (bean to bean)

  • Uneven roasting/too fast
  • Unusual amounts of smoke
  • Moving almost immediately from first to second crack

As you approach the end of the roast, you must be aware of the possible consequences of bean energy once again. The faster and harder you approach the termination of the roast, the more kinetic energy will need to be dissipated by the cooler. In other words, the more aggressive your profile curve is at this point, the harder it will be to stop the roast at your desired termination temperature. This can become especially critical if you are operating in a building that is not climatized, in an area where there are significant swings in temperatures throughout the year. Additionally, the darker the roast, the more energy is available to push the coffee past your desired stopping point. This potential problem can be handled in the same manner as you deal with gaining control at first crack: adjust the burner down or off, adjust the airflow, or both. By "slowing down" or reducing heat at the end of your roast, you will gain more control and use less energy as well. Once again, you are manipulating the rate of convection to lessen the impact of the energy of the beans themselves.

Note: A well-functioning cooling system is critical for gaining control of roast profiles. Many a darker-roast coffee has been, and still is, being ruined by inadequate or ill-functioning cooling systems. Research possible fixes.

Convection

Convection is the cornerstone of the roasting process for both drum and air roasters. It is the most dominant, the most easily understood, the most measurable and the most controllable. Once again, forced convection is heat carried by currents created by a fan or blower. You can change the rate of convection by changing the airflow, changing the energy output of the burner, or by a combination of the two. Unlike all forms of conduction in the roasting process, it is possible to make adjustments in the rate of convection that can have near-immediate effects on your roast profile. Although you cannot truly read convection, you can begin to get a handle on its effects by reading the drum environment temperature along with a bean probe, or through the use of a real-time datalogger.

Convection is truly a modern roaster's friend. A high rate of convection means coffee is roasted more evenly, more cleanly--as most smoke and chaff is pulled away from the coffee--and each roast is more controllable and repeatable. The trick is finding the technique that works best for you in your installation.

Here are 10 questions to consider or to obtain answers to as you seek to gain better control over convection, and hence the roast itself:

  1. What style of burner do I have?
  2. What does the style of burner I have mean to me as a roaster?
  3. How does the manufacturer recommend that I control the burner?
  4. How do I change airflow in my roaster?
  5. Do I need to change the airflow of my roaster?
  6. What does the manufacturer of my roaster recommend as the best way to control the rate of convection in the roasting process?
  7. Is my roaster equipped with the necessary tools to allow me to do what I wish to do with my roasts?
  8. What tools should I consider adding to my roaster, if any?
  9. Is my installation causing me to lose some level of control of my roaster?
  10. Is my roaster clean and well maintained?

Convection is the most dominant and the most controllable form of heat transfer and, as such, it is the place to start in gaining better control. Working through the questions at left can help you create a better, more flavorful product in a more efficient and more consistent manner--and that is truly the hallmark of a professional roaster.

Taking Control

Taking Control - PID Settings and Roasting Controls

FOR YEARS, THE QUESTION OF ROASTER CONTROLS has been a source of contention within the modern coffee roasting community. How much control is too much (the law of diminishing returns?), and how little is too little (do you like fl ying by the seat of your pants?). These are just some of the questions that are batted back and forth by coffee roasters. Moreover, questions about control often lead to discussions that get to the heart of coffee roasting--is it a creative art or a systematic science?

Professional roasters and hobbyists alike have debated control questions ad nauseam. It seems to matter little whether an adherent to one school or another is working on a tabletop or a four-bagger; there are proponents of each approach in every roaster size category.

Often, the discussion degenerates into a West Side Story-style face-off of backhanded compliments, posturing and outright demagoguery. Many times those with the loudest voices, longest careers or most impressive resumes win by default or through intellectual intimidation. The craft adherents accuse the "technology geeks" of being trapped in a futuristic fantasy where HAL will one day handle all aspects of the roasting process. Likewise, proponents of the coffee roasting as pure science school accuse the craft roasters of being neo-Luddites attempting to bar Darwin from entering the roastery door. Although it can be quite entertaining to listen to hardcore partisans of both schools espouse their orthodoxy, it is rarely, if ever, very informative.

Proportional Integral Derivative Controllers

One of the biggest control discussions in the coffee industry lately has revolved around proportional integral derivative (PID) controllers: logic-based controllers that allow the user to input temperature set points, and infl uence the logic. The PID's ability to control heating functions is well known but not well understood by most coffee professionals. Happily, roasters and baristas alike are trying to figure out how to use these tools to better control their respective processes.

Most new coffee roasters delivered today have at least a simple PID controller installed as standard equipment, and many come with fairly sophisticated PID profiling controllers. Most roaster operators, however, have no clue as to what PID stands for or, more importantly, how to use this technology to their benefit.

Those who don't understand the technology may use their PID controllers for set point controlling, or simply as digital temperature readers. When roasters use a PID as a set point controller, they input a set point in their controller and allow the bean or air temperature to rise to that point at which time the controller either sounds an alarm, shuts off gas to the burner or both. Although this can work very well and is a great improvement in controllability, repeatability and safety from the stopwatch and trier systems of the past, it is in fact an underutilization of a PID controller.

A properly set PID controller, with a controllable gas train, can help make coffee roasting a much more exact and repeatable process, thereby freeing the roaster to work on other elements of quality control (namely green coffee and blending) that are so essential in the creation and sustainability of great coffee.

Not all roasters will choose to use PID controllers for the roasting process, and that is their choice, as it should be. However, in order to make a valid choice, a roaster must understand existing technologies; what they can and cannot do for their businesses. A choice made without evaluating all available information is a gamble, and why gamble with good coffee? This article attempts to clarify some of the mystery that surrounds PID controllers and to look at what one roastery was able to do with one roaster in one installation.

PID Basics

So what does PID mean? What is a PID controller? What is the difference between a PID controller and PID profiling controller?

PID logic control is used in many of the better off-the-shelf digital controllers (Watlow, Omron, Honeywell, Siemens, etc.) and most, if not all, proprietary coffee roasting control systems produced by roaster manufacturers.

PID controllers make mathematical calculations to help keep the actual temperature as close as possible to a desired set point temperature. In the case of coffee roasting, the set points are generated along a positive sloping curve. If the PID settings in a PID array are incorrect, then the system will either be constantly running to catch up to the desired curve, or constantly overshooting and undershooting as the controller attempts to bring the actual temperature to the set point.

A fully functional PID controller will generate set points regardless of whether the PID settings are correct (See Graphs 1 & 2, pages 58-59). For the roaster, the trick is to find the correct PID settings for their roaster in its installation. The proper use of PID controllers is the next logical step up from manually profiling coffee through manipulation of the existing time and temperature curve. A roaster's existing time and temperature curve is the curve that naturally occurs when a single piece of roasting equipment in a set environment is roasting a particular coffee, and no changes are undertaken by the operator until the end of the roast.

So the question becomes: how do you find the correct PID settings for your roaster and its control system? For most roasters, using a PID controller with a ramping (ramp and soak) or profiling function, the PID settings will be different than those used by most proprietary roasting programs. In most cases, off-the-shelf controllers will require a slightly more aggressive P value and I value, while the D should be set to zero for coffee roasting. Many PID profiling controllers contain auto-tune functions that attempt to assist with PID settings. It has been our experience however, that auto-tuning functions do not work well for setting PID values for the coffee roasting process.

To properly set PID settings, it is imperative to understand what each part of the PID acronym means and its effect on the logic used to control the heat input:

(P) P, or more accurately, proportional, is the part of the logic that dictates how aggressively a system will try to acquire the set point. The larger the P, the faster the controller will ramp up temperature. If, for example, you set a P value of 1, it will reduce heat input as it climbs toward the curve so that it will gradually intersect. If the P is 50, the output will be more aggressive. The output will remain at 100 percent until very nearly reaching the point of intersection.

In other words, P defines the distance at which your foot comes off the gas as you approach a line of traffic. Remember, the larger the P, the more aggressive the control system and gas train are (See Chart 1). If P is too aggressive, it will supply energy up to the point of intersection and then drop immediately to zero percent output. In a process like coffee roasting where much of the energy is retained and the product itself will begin to go exothermic, an aggressive P will often overshoot and, depending on where in the roasting process this occurs, may eventually fall behind the curve, causing the control system to constantly chase the desired profile curve (See Graph 1, page 4).

(I) If P is your gross adjustment on your control system, then I is the fine adjustment. I, or integral, is the value inputted to raise the temperature slightly so as to attain set point: the gain. I values work in an inverse relation to the P values. The larger the I, the smaller the gain, the smaller the I, the larger the gain (See Chart 2). Because I is the fine adjustment, I should not be adjusted until the P value is set. Too much I (low number) will cause the system to be unstable around the set point, while too little I will lead to proportional droop, when P is correctly adjusted (See Graph 2, page 59). Good control of the process is a function of PI.

(D) Finally, there is the D, or derivative, value. Derivative is the value that is used to dampen oscillations about a set point. It is in essence a "super fine" or squelch adjustment. In our experience, if a controller utilizes a bean probe for actual temperature control, then there is no need for a derivative value. However, if a roaster is using environment temperature to control the process, then a derivative value may be desirable.

The graphs used in this article rely on bean temperature as the temperature to be used in controlling the function; environment temperature is logged only and not used for any calculations, and therefore the graphs have a D value of zero.

Charts 1 and 2 list different P and I values and their relative effects on output.

Let's first look at P settings.

P VALUE I VALUE Temperature difference when output starts to be less than 100%
1 0 99 degrees
10 0 10 degrees
20 0 5 degrees
30 0 3.4 degrees

What does this mean? If you look at the temperature difference value of a P of 20, the difference is five degrees, which means that the output calculated will be 100 percent if the temperature difference is five, 50 percent when the difference is 2.5 and zero percent when the difference is zero. So over the five degrees difference, the output will be scaled anywhere in between.

Now hold P constant and add different I values.

P VALUE I VALUE Output percentage at 2.5 degrees difference
20 0 50%
20 20 50.09%
20 10 50.18%
20 0.5 53.6%

This shows what kind of gain the I value provides. The output calculated is not as simple as shown here. The complete calculation is based on elapsed time between calculations, how the temperature is responding to the output, how fast the temperature was rising/falling, etc. PID calculations are not easily understood. However, hopefully this will provide you with better insight as to what changing the settings will accomplish.

A Test Flight

So much for the science (or attempted explanation thereof). What are the practical effects of PID settings in programmable controllers, and how to read and set them?

As most experienced roasters know, the actual act of roasting coffee is a fairly simple undertaking. Turning the coffee from a certain shade of green to a certain shade of brown seldom rises to the level of rocket science.

That said, choosing which beans to roast to what level and the profile to be followed to bring the most out of each and every coffee, each and every time, can sometimes rise to the level of pure magic. Like magic, consistent roasting takes an intimate knowledge of the equipment used, a high degree of technical excellence, continuous practice and an open mind. Accepting technological change takes an open mind.

To test and set our PIDs, we did extensive research on a 15-kilo Ambex coffee roaster retrofitted with the Profile Plus DCQ system. The equipment operates on natural gas, has a total exhaust length of 27 feet with (1) 90-degree angle at the base of the roaster and ending in a "no-loss" stackhead. All roasts were conducted in a hands-off manner (that is, once PID settings were made and the roast started, there was no human intervention). All roasts were subsequently cupped for quality. All data (including all roasts conducted since October 1, 2004) have been kept and are reviewed against subsequent changes in atmosphere, green coffee crop and periodic roaster maintenance. Much of the initial PID research was compiled by Paul Ribich for the SCAA's upcoming Coffee Roaster's Handbook. The graphs used in this article are actual roasts taken from the data log files and shown in the log reviewer format.

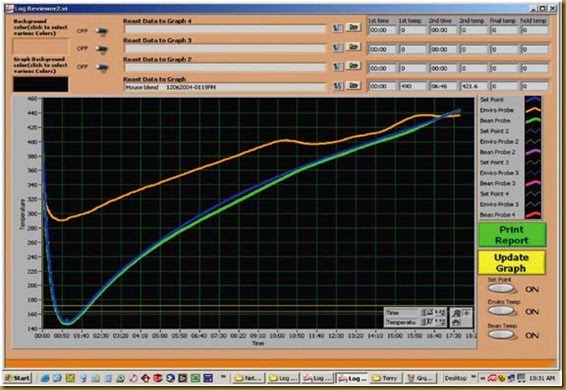
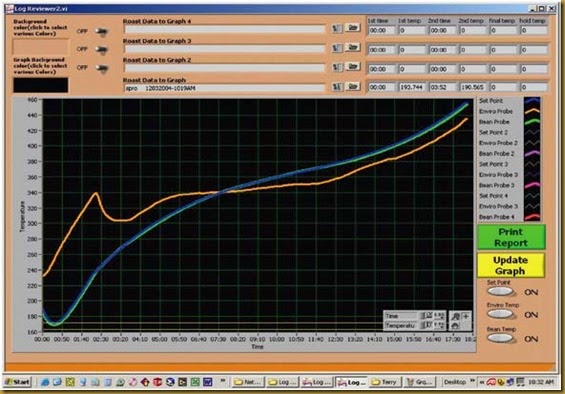
Graphs 1 and 2 are actual examples of what happens when PI settings are incorrect. Graph 3 is an example of correctly set PI values for a roasting process. The following graphs display three data lines: desired profile (set point) in blue, environment temperature path in orange and actual bean temperature profile in green (graph legends on right of graph).

In Graph 1, it is easy to see what occurs when a P value is too large. The overly aggressive proportional function causes the actual temperature (bean temperature) or green line to overshoot the desired profile/set point curve (blue and purple) three successive times. Not only is the bean temperature generally above the desired profile curve, it has produced its own distorted (and undesirable) profile curve. In fact, the green line appears to almost "bounce" from line to line as time progresses. The correction to this problem is to reduce the P value until overshooting is alleviated.

Graph 1graph_1
Graph 2
graph_2
Graph 3graph_3
Graph 4graph_4

In Graph 2, the gross overshooting or bouncing of the green line has been virtually eliminated. However, upon closer inspection, it is clear that the bean temperature, while maintaining the shape of the desired profile curve, consistently tracks below the blue and purple of the desired profile. While many roasters would be very pleased with a time and temperature curve as close to target as this, it is actually possible to shift or "gain" this droop away by adjusting the I setting. What is needed in this example is a more reactive I. A faster integrating action can be acquired by using a smaller I value. The correct I value will, in effect, offset the droop of a correctly set P.

Eureka! Graph 3 shows what happens when PI values are inputted correctly. Set Point and Bean Probe lines are married up from start to finish. The Profile line is acquired at Hold Temperature, and all three lines track consistently from that point forward. Not only is the desired roast time and temperature reached (within a five-second window), but the integrity of the desired profile is maintained throughout the entire roasting process.

Kathi Z's Magic Trick

The final graph, Graph 4, is of a one-pound roast in a 15-kilo roaster. Kathi Zollman, roast master for New Harmony Coffee & Tea, by experimenting with PI settings, consulting Paul the engineer, and adjusting initial drop temperature, was able to get a one-pound roast to follow a pre-set profile, a feat that even the manufacturer thought impossible. The inability to control a small fractional batch in a drum roaster has long been a problem, even for experienced roasters. To get a small batch to actually follow a large-batch profile was considered pure magic.

A closer inspection reveals how the environment temperature (burner) was constantly adjusting to keep the bean temperature on the desired profile. Although this roast, like the others shown, was accomplished with a hands-off technique, it required an experienced roaster utilizing all her talents to ascertain and input the correct settings. Such things as total energy present at start of roast; energy acceleration and bleed rates; responsivity of controls; accuracy of temperature readings (bean temperature); changes in conduction and convection ratios; and the green coffee itself (hard bean, soft bean, old crop, new crop) all played a part in determining the PID settings and the desired profile. Like a good magician, Kathi just made it look easy. (As an aside, the coffee cupped admirably as well.)

Expanding the Realm of Possibilities

As an industry, we are entering a time when new control technologies are becoming more widely available and cheaper. This, coupled with the exchange of information being fomented by the rise of the Roaster's Guild, online coffee roasting bulletin boards, and more technically oriented and focused trade journals, are increasing the level of professionalism of the specialty coffee industry and expanding the realm of possibilities for those of us who have committed our livelihood, and lives, to this industry. As to the question of whether coffee roasting is art or science, it has always been both. A good roaster needs the intuition of an artist, the work ethic of a craftsman and the inquiring intellect of a scientist to truly become a master.

PAUL RIBICH is the process engineer for Ambex, Inc. He has a BS in mechanical engineering and an AAS in mechanical engineering technology and is a former team leader of advanced processes at Watlow Electric's Temperature Sensor Division. Paul is a member of the Roasters Guild who changes his own oil and is an avid woodworker.

HANDS - ON CONTROL

BY KATHIZOLLMAN

I consider myself an experienced roaster. After seven years of roasting, I'm comfortable with my baseline knowledge and my understanding of the roasting process. However, I'm finding that today's coffee roasting environment is one of constant change. The craft is being immersed with science, offering us new ways to unravel the mysteries of roasting, such as what really happens to the green coffee during the roasting process.

The primary concepts I learned in Coffee Roasting 101 are important in understanding the fundamentals of the roast, and it's this base knowledge that gives me a level of comprehension as I turn my focus to new ideas and concepts of control like PID controllers.

For years, I used a digital timer and temperature probe to achieve consistency in my roast profiles and had satisfactory results. But I found that I had to move out of my comfort zone of familiar techniques and terminology to learn the new skill of controlling the roast with PIDs. While this was an intimidating endeavor, my newfound roasting skills and working knowledge of PID controllers (although limited) has been rewarding and exciting.

I feel that learning the scientific language and mastering the basics of PID controllers provided me with a new level of expertise. When I combine this new science with my craft, I have a new roasting tool that helps achieve a controlled path to the completion of each and every roast.

Today, I control my roaster environment and the manner in which my roasts progress to the desired drop point through the logic of the PID controls. This allows me to look beyond time and temperature as the main components of the roast profile. With the PID, the S-curve becomes my tool for discovering the best path to a desired roast. To determine the most desirable roast profile, I cup various profiles of the same coffee roasted to the same degree. I alter the S-curve of each trial roast for an aggressive start or a gentle curve, for a shorter or longer rest period. When I cup the varying profiles against one another, I find that the path taken to the drop point changes the cup characteristics of each coffee, that the path itself is as critical as the time and final temperature.

Initially I was overwhelmed with the entire concept of control and PID and, had I been a rookie, it could have been setback for me. Still, I attempted to break the process down to its simplest form, making this foreign concept not quite so overwhelming.

I learned that the P of PID means proportional; I find it's easier to remember as "power." The amount of power I apply to the roast to reach the desired temperature in a pre-designated time frame. The higher I set the P value, the faster the temperature climbs. If my initial P settings are too high, the profile path is overshot and it's difficult to slow the roast down and regain control.

Once I get the P set so the roasting profile is followed consistently, I rely on the I, or integral, setting to fine-tune the roast profile. The I setting provides output boosts to keep the roast on track when the prescribed P setting isn't maintaining a smooth path. I settings can be confusing, in that the higher the I value, the smaller the gain, while a low I value provides a greater output.

With the control system I have in place, I don't even have to use the D, or derivative, setting. I'm able to have enough control without adding the additional variable.

It takes time and patience to establish accurate PID settings for desired roast profiles, but once the setting are locked in, very little additional tuning needs to be done.

Now that I have PID settings in place, I can accurately duplicate roasts on an ongoing basis. I was surprised to learn that weather conditions such as barometric pressure and temperature have less of an effect on the process of the roast than when I attempted to control the roast manually. To compare my roast results, I pulled up roast data graphs of the same coffee profile roasted on four different days (one day near freezing, one day 80 degrees, one rainy day and one overcast day). All four roasts shadowed one another within a three-degree spread. Graph 5 shows roast profile data from four different roast days, all four being the same coffee and same profile. The top four thin lines show the environmental temperature in the roaster. It's evident that the system was working hard to maintain the profile by looking at the range in temperatures. The wide lines represent the prescribed profile and the actual profiles of the roasts. The lines aren't clearly visible, but there are eight lines grouped together showing the path each roast took.

Graph 5graph_5

These graphs support the idea that roasters can replicate the roast process accurately and consistently with PID controls, without having to reset perimeters when external variables change.

I've also discovered that PID controllers allow me to use varying charge weights of green coffee and follow the same profile, without resetting the roast perimeters. Again, the science provides consistency for me as a craftsman--within a controlled roasting environment, I can roast a 12-pound batch of coffee with the exact profile as a 24-pound batch, with the same results.

I encourage roasters to invest the time and brainpower to learn how to use PID settings as a tool. It's habit-forming, and I find I always want to try something new or make a slight change, just to see what happens. The applications seem endless to me. So many roast factors can be changed or experimented with to roast the perfect coffee and to create a roast style unique to each roaster.

KATHI ZOLLMAN has been in the specialty coffee business for 10 years. In October 2004, she joined the PID team and became the roast master at New Harmony Coffee & Tea in Clearwater, Fla.